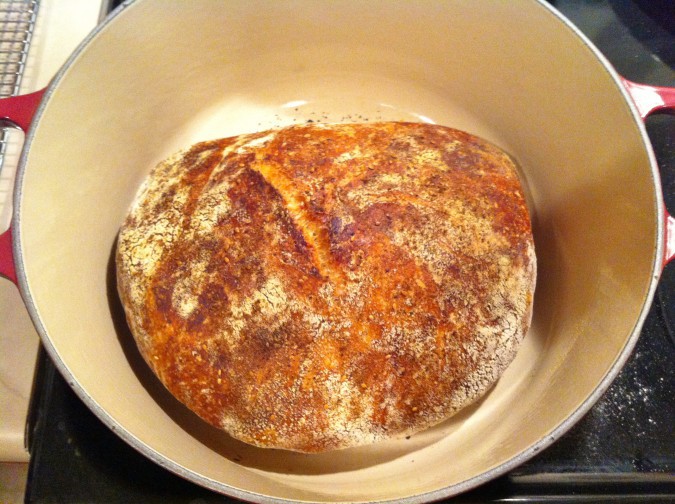
One of my birthday resolutions last year (last year! that sounds crazy!) was to try my hand at baking bread. For A.’s birthday, I attempted some sourdough that came out okay. Well, for Christmas I got a beautiful enameled cast-iron Dutch oven, so my parents passed on to me a recipe for no-knead bread that requires baking in a pre-heated Dutch oven.
The recipe is simple:
- 3 cups bread flour
- 1 1/4 tsp salt
- 1/4 yeast
- 1 1/3 cups cool water
- additional flour for dusting
The recipe comes from Jim Lahey’s book My Bread: The Revolutionary No-Work, No-Knead Method. Since my kitchen has limited counter space, anything that requires less of it is an improvement! Plus, there’s such an art to kneading dough: too much, and it becomes tough, but too little and the gluten doesn’t develop enough. I was just as glad to take that element out of the equation (well, not to mention the whole complexity of having a starter, which I needed for the sourdough).
I mixed the ingredients up on Sunday night, since the book recommends a 12-18 hour first rise. I brought the bowl into our bedroom overnight covered with a cloth. Yes, you read that right. The dough needed to be at “room temperature” in order to rise, and the bedroom is the only room we heat at night, so I knew the rest of the apartment would be too cold! The dough wasn’t sticky like the recipe said it would be, so I was a little apprehensive. But sure enough, when I woke up Monday morning the lump had grown a little bit. I left it on top of the refrigerator (hopefully also warm?) to continue rising while I went to work. It had developed a couple of dry, kind of scaly spots on the top, so I think it was simply too dry (which is also probably why it wasn’t sticky).
That evening before dinner I dumped the dough out and formed it into a rough ball on top of a dusted tea towel. I folded that around it and left it to rise again for another few hours. Part of the trick to baking this bread is putting it into an already hot dutch oven. Well, I discovered in the instructions for mine that you are NOT supposed to heat an empty pan, because it could damage the enamel. Hmm. After some brainstorming on the phone with my mom, we came up with the idea to put a little bit of water in the bottom while letting it heat with the oven and then pouring it out before adding the bread. It worked! The water was SUPER hot, of course, as the oven needed to be at 475 for this recipe, but I got it poured down the sink sans burns.
The potentially tricky part of this recipe is transferring the supposedly sticky dough from its home on the tea towel into the HOT pot. As I mentioned, my dough wasn’t particularly sticky, so I had no trouble on this step. It baked with the lid on for 30 minutes, and then for another 15 without the lid to allow for browning.
It came out pretty beautiful!
I will warn you, this is a very crusty bread. I think that’s the point of using such a hot pot to bake it: the outside gets sort of shocked and so becomes really crusty. Despite all my efforts at providing it warmth, my bread was a little dense, so I think it didn’t quite rise enough. But you live and learn. Lahey’s book has tons of variations on this simple recipe, and you could probably also come up with your own. The hardest part of making this bread is making sure you start it early enough to have plenty of time to rise. Otherwise, this yields fancy-seeming homemade bread with pretty minimal effort! I’d recommend it if you’re interested in baking some bread but aren’t sure about the entire process. Bon appetit!
